The start of the project

In May 2010 we (Marc van Kempen and Wim van Dijk) travelled, together with our wives, from the Netherlands to Toronto Canada. While the girls started their own road trip we took the Greyhound bus to Sudbury where Tom picked us up and took us to his place on the Vermillion river in Whitefish. There we stayed for 2 weeks to build a Birch bark canoe. The cabin on the right is the place where we lived for 14 days, the shed on the left is the work shed where the canoe will be build.

A preview of the canoe we built. The basic model is St.Francis Abenaki but we adjusted the measurements a little. We kept the ends a bit low because we will use it mostly on Scandinavian lakes (but also French rivers!) and this way the canoe will not be blown away. Tom, sitting in the back, and Wim are the first ones paddling the canoe on The Vermillion river after it is finished.

Most special on this project was the fact that we started empty handed, went into the Ontario woods with Tom, and gathered all the materials we needed. In 14 days we built the birchbark canoe with hand tools only, and natural materials. Working together with Tom Byers, who taught us his skills, was quite an experience and very instructive. To learn more about Tom visit naturalbirchbarkcanoes.com.

Read our story below, you can click on the pictures to see them in a larger size.

Splitting Cedar

It all starts with splitting Cedar wood for the ribs, the sheathing and the gunwales. Tom shows us how its done. In fact of course, you first have to go in to the woods, find a cedar tree and split it, but Tom had already done that for us in preparation for our arrival.

Marc working on the shaving horse with a draw-knife modelling a rib.

After modelling Tom splits this piece of Cedar, now we have two ribs. Pictures below: Tom splitting cedar for the sheathing of the canoe, with his knees he guides the split.
When Tom does it it looks very easy but it surely takes some practice.

Gathering Spruce gum and roots

To make the seams of the canoe watertight we have to collect Spruce gum. Later the gum will be heated and mixed with bear fat to make it more flexible.
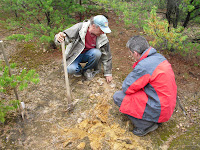
The pieces of birch bark are lashed together with roots. Here we collect roots from the Jack Pine, the best place to get them is in sandy soil where the trees are not too close together. At first you use a pick axe to pull up a root.

Then pull it out of the ground following it as it goes under and over other roots.

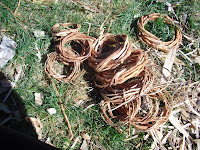
Once we had a bunch of roots we took them home to split them immediately, its easier while they are fresh. Marc is wearing gloves because the roots contain stuff that makes your hands dry out.

After splitting and peeling the roots we stored them. When we were ready to use them, we soaked them in warm water until they are flexible

At the end of a hard days work its good to relax in the company of a beer and Tom playing guitar.

Gathering birch bark

A beautiful morning on the Vermillion river at Tom's place. Pictures below: A big day, we go into the woods to gather birch bark. The bark comes from the White Birch tree. Tom searches for straight trees without low branches or large knots. He explains and shows us how the bark is peeled of. The way Tom does it the tree is damaged but will not die. You must also look closely if the bark comes of in one piece and does not split in several layers (like a book). To do so you make a small incision in the bark and see if the bark stays intact or if layers appear.
When the bark is peeled of you lay it in the sun to warm up, then slowly wrap it. Tom and Marc are sniffing the bark, it smells delightful.

Putting all the pieces together, building the canoe!

After wetting with hot water the bark is unrolled on the building platform. Tom and Marc are putting on a temporary inner frame/form. This form defines the shape of the canoe.

To hold the frame in place you use big stones, it is said that ancestors live in these stones and this way they help you building the canoe...

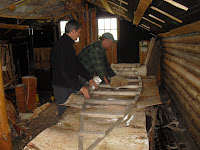
And then one morning we looked out of our window and all was white. Middle of may, clear blue sky, 10 cm of snow, it was beautiful. But because of the snow we had to work indoors. Pictures below: Again we came to a point where choices had to be made because of the model we chose. Depth, width and shape are fixed with the inwales, the bark will be shaped around it.
At the ends the inwales are laminated, bend and tied in shape with a rope Pictures below: To bend the bark upwards around the inwales and hold it in place you put stakes in the holes of the building platform. Open spaces are filled with extra pieces of bark. Wim is doing his favourite job, lashing and sewing. Here he is sewing the bark together with roots.
Detail picture of the way the canoe is kept in shape. The pieces of bark are pinned together with dowels before sewing.

Now its time to make the outwales. Again a very long piece of cedar is split in two, its a delicate job and Tom takes care of it himself. Pictures below: It starts to look like a real canoe, the outwales and inwales are lashed together with roots, its a time consuming job but again its Wims favourite! Then the definite thwarts are made and lashed to the gunwales.
Next come the Bow and Stern. To start you need to make the stems, wooden pieces that fit into the very back and front of the canoe. You split the wood in 8 pieces but not completely, at one end the wood remains whole, in fact it is laminated. This way it is easier to bend.

With hot water the stem is bent in the mold and put away to dry. Marc is watching Tom bending the stem.

After the stem has dried a rope is wound around it to make sure it stays in the shape you want. Pictures below: When the stem is put in place you can cut the bark in shape just past the stem, then the ends are lashed together with a crisscross stitch. We're exited, we really like the shape of the bow and it starts to look like a beautiful canoe.

Ribs and sheathing

After the inner frame is taken out it's time for the ribs. Here the ribs are put in place on top of the canoe and marked at the edges for bending.

Marc and Tom are numbering the ribs so they can be put back in the correct order after bending.

The ribs are put in boiling water for 5 minutes above a campfire, then bending is a piece of cake. Marc takes care of the fire while Tom and Wim bend the ribs. Bending is done two ribs at a time.

Then the ribs are temporarily fixed at the right position and left to dry for a day or two. After drying the ribs are marked for trimming of excess length and taken out of the canoe.

The ribs are kept in place with clamps, they made me think of giant clothespins.

Our canoe is 15 feet long so we need a lot of sheathing inside the hull. So again Cedar splints are split to use for sheathing. This process is particularly difficult as you have to split the cedar down really thin. Tom does the lion share of the splitting as we are running out of time, we take care of smoothing the sheathing down to proper size and form. Pictures below: Marc working on the shaving horse with a draw-knife smoothing the sheathing. Each piece of sheathing overlaps the one below like shingles.
Wim is shaping the ribs ends to a wedge shape after they are trimmed.

An historical moment.... the last rib is about to put in place.

The ribs are fixed in the canoe by being forced under and between the outwale and inwale, then driven forward. Wim is working on the very last one.

Click on the link "Older Posts" below to continue.